How can you improve your food photography skills?
Check your Facebook or Instagram feed and you will, most likely, see a barrage of food photos being shared, like images in a slot machine. Everybody – and I mean everybody – seems to be into food photography, sharing snapshots of the latest, most delicious treats they’re about to enjoy.
What are the Best Food Photos?
Brilliant food photography makes your tummy growl and your mouth salivate–the kind that you want to grab off your computer screen. The best food photos are the ones that push you to run for the kitchen, fingers crossed that you’ve got everything you need to whip up the dish that you saw online.
You need not be a seasoned photographer to take mouthwatering photos of food, but you would still need a little practice. Here are some of our food photography suggestions that can help you develop your food photography skills:
7 Finding the Hero Angle
The Hero Angle should be able to show the ingredients and layers of your food. It will tell the audience all there’s to know how it was prepared. The best way to find the dish’s hero angle is by taking the three most common angles and then comparing them side by side.
The photo that look best should be placed at the top of your article. You’ll want to see this as the image Google uses to boost your blog post.
The other angles and photos can be placed further down the article to help your audience visualize and imagine your food.
Whichever photos you pick, do stay away from angles that can make your food flat or blurred. For instance, a pizza doesn’t look scrumptious being shot straight on because it is a flat subject.

With flat foods like pizza, the safest angle to shoot from is overhead. Nevertheless, it wouldn’t work with other dishes like a hamburger—we don’t want to miss those juicy layers of meat, cheese, and veggies. We’re better off snapping a hamburger straight on.
6 Shooting a Food Story Your Viewers Can Relate To
One of the most wonderful things about food photography is the food story that readers and viewers can connect with.
The internet could feature a thousand chocolate cake recipes. What would make your readers want to try your cake over the thousand others on Pinterest? Your food story.
How you choose to style your food and shoot the photos can support your food story. Having a compelling story encourages readers to relate to your recipe. It evokes memories, emotions, and nostalgia.
So, how do you tap into your audience’s emotions through food photography? Well, you’d want to shoot the process of your recipe. Show the audience how it’s prepared, where the ingredients are sourced. Once the reader connects with your food story, they are more likely to check out your other recipes.
5 Getting Your Food Photography On Tastespotting or FoodGawker
You need not have the world’s greatest food photography style to have a flourishing food blog. Nevertheless, you need to shoot your subjects spectacularly.
This is mostly true if you want to get your photos on food photography sharing sites such as Tastespotting and FoodGawker. This is the aim of most food photographers.
Exposing your images properly is the first step to having professional-looking shots. If you’re shooting on manual, use your exposure meter to check whether your photos are under or overexposed.

Too dark, your audience won’t relate to your food photography and story. Too bright, you might miss capturing important details. To see if your pictures are too light or dark, take a look at your histogram.
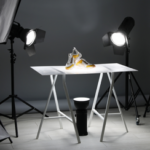
4 Shooting Professional-looking Photos
Yes, most professional photographers have access to tons of pricey camera equipment and props that help them improve their photography. However, keep in mind that you don’t really need equipment that cost an arm and a leg when it comes to food photography.
Instead, maximize your quality textured backgrounds and dynamic light.

When you could invest in a couple of professional backgrounds, it will greatly elevate your food photography to a whole new level. The best backgrounds are those with texture, a few different hues, and a ‘blue’ feel. These hues and textured backgrounds also help improve your food story and have a touch of “luxury.”
The best food pictures have great lighting. It allows us to see colors, colors, texture, and scale.
3 Using Neutral Props to Make the Subject Stand Out
Props are a vital part of food photography and your food story. You wouldn’t need too many props to take good images, but props help make photos more interesting.
However, there is a catch: props can also take the viewer’s attention and focus away from the food. Hence, use props that are neutral and not overly striking.
Props with bright colors, bold designs, or unusual shapes will capture the eye of your audience. As food photographers, our aim is to make our dish catch attention first. We are driving the viewer to focus on our food by sticking to neutral props.
2 Recipe Testing to Improve Food Styling
Styling food is essential in food photography. Knowing how each ingredient reacts when being cooked and prepared is the most important step towards making it drool-worthy.
Watch how the food looks as you cut and cook it when you’re trying to create your dish. You want to stop brown or discolored food, go limp, sink, or dry out for the photos. If this does happen, you can use some tricks to stop it.

Use your testing stage for the recipe to make sure the food looks best when you film it. Use stand-in food if you have a specific dish that would melt, discolor, or dry out. Knowing how your food will behave will improve the quality of your food photography.
1 Color Correcting Your Food Images
In food photography, color is important; it is the key connection that brings us and the food together. We want to make sure that the colors in our pictures are as true to life as possible for your food blog. This would mean ensuring our photos are color corrected before we upload them to the site.
It can be achieved during post-processing, but the best approach is to ensure that the white balance is right on. You can adjust your shot’s in-camera white balance. Choose the sort of scenario that you fire with.
Food Photography Conclusion
For your food blog, the best food photography is the one that showcases your food story. It’s important to be consistent in branding and image quality. Ensure that your pictures are well lit, catching various angles that display the food in its best light.