At some point, every photographer creates images featuring light trails and it’s easy to see why. Beautiful and always a hit online, light trail photography is a well-trodden path in photography, as the vast majority of aspiring photographers live near roads or in built-up urban areas. While lights trails are a great subject in themselves, they’re a particularly nice way to introduce a budding photographer to the manual mode on their camera and will also provide some good training in low-light photography.
What Is Light Trail Photography?
 Light trail photography is a type of long exposure photography that highlights the movement of light over time. While this sounds like something from a physics textbook, it is actually quite simple in reality.
By keeping the camera shutter open for a long period of time, you can collect more ambient light and show how that light moves across the frame, hence creating light trails on your photos.
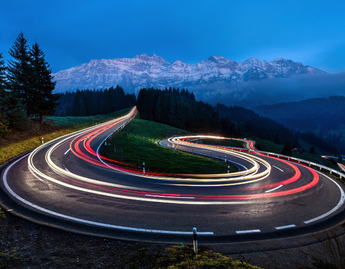
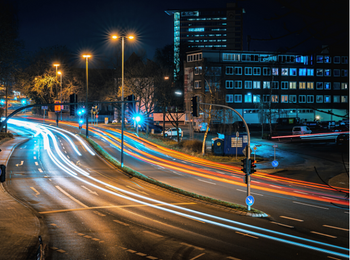
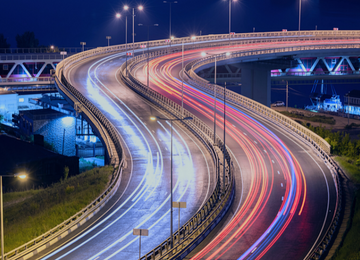
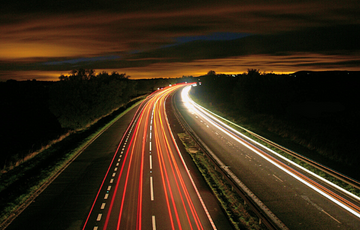
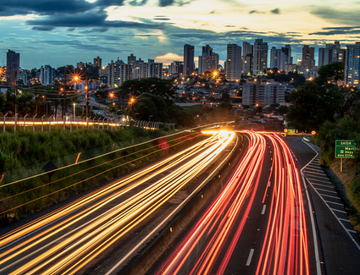
Light trail photography creates a beautiful image from the simple movement of lights seen in everyday life, like car headlights and taillights, headlamps, streetlamps, streetlights, and even bike lights. While you can move a flashlight or laser to create lines in the air, known as light painting, the most common depiction of light trail photography is on a roadway.
Car light trail images capture the paths of illumination created by the headlights or taillights of a vehicle and create well known and widely adored images of traffic and light moving over time.
What Gear Is Needed to Photograph Light Trails
As camera technology has developed over the years, the capabilities of the everyday consumer camera has gotten more and more impressive, to the point where you can capture light trail photos on any camera, even your smartphone’s! However, there is one prerequisite for capturing light trails, and that is the ability and knowledge to control exposure settings, particularly those that allow you to choose longer shutter speeds, in the area of 10 seconds to 1 minute.
 What this means is that in order to capture light trails, you must have a camera or a camera application that can shoot in either full manual mode and/or shutter priority mode.
All DSLRs and interchangeable lens mirrorless cameras should offer this functionality, though certain compact cameras, film cameras, and native smartphone camera apps do not.
However, if you’re desperate to shoot light trail photography on your smartphone, there are specific apps that should allow you to adjust shutter speed and other camera settings.
“You must have a camera or a camera application that can shoot in either full manual mode or shutter priority mode.”
The one other prerequisite for light trail photography is a tripod or some means to rest your camera in a locked off position for a period of time. As such you can perch your camera on a concrete railing, the ground, or even a car in a pinch but it’s really best to work with a sturdy tripod if you have access to one. This is because any form of camera shake can ruin light trails due to the extremely long exposure time required for this specific type of photography.
Another beneficial piece of gear is a lens hood as these block flare from ambient lights, creating clearer light trail photos with less ambient light bleeding in. Another good investment would be a remote shutter release, which allows you to trigger your camera without pressing the shutter button and causing camera shake.
While the two-second or ten-second self-timer is an adequate substitute for a remote release, it can be inconvenient to wait for the shutter to fire while shooting, not to mention it can throw off your light trail photography timing.
One last item to consider is a natural density filter, also known as an ND filter.
 ND filters block light to allow for longer shutter speeds, and usually aren’t necessary if you’re shooting in complete darkness.
However, if you plan to elongate your shutter speeds around sunset and at dusk and shoot light trails during the golden hours, then an ND filter might be a smart investment to help you have complete control of lighting and exposure.
What Are The Best Shutter Speed Settings For Light Trail Photography?
Whether you shoot with a film, digital or phone camera, understanding how each setting functions together and knowing how to adjust the standard camera settings of ISO, aperture, and shutter speed are essential to capture light trail photography. Below is a basic rundown of all the settings that you need to understand for light trail photography:
ISO
ISO is a measure of the light sensitivity on the digital sensor of DSLR, mirrorless and compact cameras. The way ISO functions is relatively simple – the higher the ISO, the more light a camera captures.
Most standard DSLR cameras have ISO settings that range from ISO 100 to ISO 1600 while other cameras may have even higher ISO options.
The trick with ISO is to try and keep it as low as possible, which helps reduce visual noise, a very unappealing look on digital and film photos. Instead, you should be using the long shutter speed used for light trails to gather more light, compensating for the lower ISO.
Shutter Speed
Shutter speed is arguably the most important setting when it comes to light trail photography and essentially represents the amount of time a camera’s shutter remains open to let light pass through the lens to the camera sensor. Shutter speeds range from thousandths of a second to many seconds or minutes. Light trail photography favors longer shutter speeds, between 5 and 60 seconds, so you can capture the full motion of light across the frame, creating interesting and visually appealing light trail photography.
Aperture
The aperture controls how much light your lens lets in the camera, different to shutter speed in that aperture directly related to lens’ diameter instead of sensor exposure time.
 On both film and digital cameras, the aperture is also called a f-stop and is labeled on cameras with measurements like f/8 or f/22.
A favorable aperture setting for light trails is typically about an f/16, which is a relatively deep focal length, meaning that most items in your frame will be easy to see.
Self Timer
Self-timer functions are available on most DSLR cameras and are incredibly useful when it comes to light trail photography.
Since shutter speed and aperture settings for light trail photography let light enter the camera for longer periods of time, any bump or shake of the camera will cause blurry images. As such, using the self-timer function to avoid this is high recommended.
Even better would be to use a shutter release as discussed earlier, which takes out the need for difficult timing or potential bumps.
“Any bump or shake of the camera will cause blurry images, which can be avoided with a self timer.”
Bulb Mode
Bulb mode on a camera is when the shutter button is pressed down for an extended period of time, keeping the shutter open for as long as the button is pressed down. Photographers can try this method of capturing light trails if they have very stable hands or are using a tripod that won’t move when the shutter button is pressed. The benefit of this technique is that when moving objects with light are consistently passing past the camera’s vantage point, this method allows for easy capture of light trails that require specific manual timing.
How These Settings Work Together
When you better understand the relationship and interaction between ISO, shutter speed, and aperture, you can play around with each function to get the best shot from your chosen vantage point. The most important thing to remember with light trail photography is that the darker the environment, the more light you want to pick up.
As such, shooting on a higher ISO with longer shutter speeds and wider aperture settings will let an appropriate amount of light pass through your lens to create a visible light trail. A good place to start would be around ISO 800, with a shutter speed of five seconds or longer, and an f/8 aperture.
What To Do After Shooting Light Trails
Once you have gone out and taken some excellent light trail photography, the next thing to do is publish your work for all to see! However, before you do, there’s one final step to take to ensure that your work is safe, secure, and easily recognizable online. As a digital content creator who publishes any form of work online, you should know the importance of watermarking your work.
“Watermarking can’t be beat, allowing you to safeguard your work from any potential content thieves.”
Watermarking is highly regarded as one of the best ways to establish an easily identifiable brand online.
 Much like how a painter adds their signature to a painting, watermarking with a custom watermark can help potential clients identify your work, helping your photography stand out in the sea of content on the internet.
But that’s not all! In terms of security, watermarking can’t be beaten, allowing you to safeguard your work from any potential content thieves and protect your copyright on all work you publish online.
While there are a few tools online that allow watermarking, no tool can match the free bulk watermarking offered by WaterMarquee.
So, what are you waiting for? Get out there, take some amazing photos and protect your light trail photography with WaterMarquee today!