Designing a great photography website
As a professional photographer, your photography website is the sole most crucial part of your brand identity. It determines how prospective clients see you and tells whether they reach out to you for a quotation. And while professional photographers are excellent at producing compelling photographs, that skill does not necessarily translate into web development and design skill.
Here are eight tips for creating and designing an attractive and effective photography website that can help you attract more clients:
Begin with a Photography Website Pre-made Template
Before, having an attractive website meant hiring a web designer to create custom photography websites from scratch. Thankfully, those days have passed. Creative website photography builders like Pixpa offer wonderful all-in-one photography portfolio pages, with email, hosting, user-friendly page-building tools, as well as a wonderful collection of website templates. If you want to tinker with codes, you could also set custom CSS.

Yes, some photography website builders and are better and easier to use than others. Make sure to work with professional tools and steer clear of badly designed “free” choices that would use up too much of your time and energy.
Pick a Focus and Stick with It
When an art director or corporate client visits your photography website, they would want to see what you are good at as quickly as possible. For instance, they are searching for the best wedding photographer for the job, not a general photographer who has some wedding photos thrown in with food, wildlife, and architecture. Prospective customers should know what you are best at from the get-go when they visit your photography website.
If you don’t have a specialization yet, you would need to find your particular niche. This could be difficult—emotional, even. Ideally, you have to find the overlapping part of the Venn diagram representing what you are good at, what you feel is creatively gratifying, and what your target market wants. Once you identify your specialty niche, describe it in layman’s terms. Genres like lifestyle, food, portraiture, sports, reportage, architecture, and product all have skillsets and definitions associated with them.
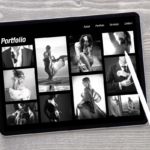
Use Helpful Gallery Titles
Once you have settled on a photography niche, you would need to create galleries that clearly show your specialty. A great way to do that is by putting correct and helpful gallery names to distinguish your work.
Avoid ambiguous gallery names like “things,” “places,” and “people.” Prospective clients are not searching for a “places” or “thing” professional photographer; they are looking for a wedding or landscape photographer. Ensure that you satisfy this expectation.

Build galleries around one specialty with less than about 30 photographs per gallery. Provide names that clearly enlighten clients on what they would find inside. Please stay away from vague labels like “projects” or “gallery one.” They do not identify what the client would expect, and they delay answering the important question, “What’s this professional photographer best at?”
Show Only Your Best Work
This is perhaps a no-brainer, but a lot of photographers post sub-par photographs without even realizing it. Perhaps it took you a six-hour hike to capture a particular landscape, or you feel an emotional connection to a certain photo. Sadly, if that does not translate into a top-quality image, the client would not bat an eye. They wouldn’t be able to create a connection you have with the photo anyway, so ensure that any photo you upload could stand on its own as your best work.
Create an Insightful “About Me” Page
Your About Me page should be useful to clients. Yes, of course, you want your prospective clients to know what you’re like, but your About page isn’t the proper venue for long, personal anecdotes. Your clients, to be honest, are not interested in knowing which photo you first took or which portrait photographer is your inspiration. They just want to know what photography niche you are good at and why customers like working with you.
Quickly outline your photographic specialty then let them know why clients should get your services. You can likewise include a sneak peek into your personality without getting sentimental or redundant. Definitely include a good photo of yourself!
Provide Accurate Contact Details
Sharing contact details on your About page is alright, but it isn’t enough. Prospective clients shouldn’t have to look around your website to find your contact details. Make it so obvious that they wouldn’t miss it: have a page labeled Contact on your website navigation bar. When potential clients click on it, they should be able to see your email address and phone number right away. If you have an office or a studio, include that address, too.
While it is true that contact forms offer a great deal of info to the website owner, they are actually generic and impersonal, creating unnecessary friction that could be a barrier to contact. Nevertheless, if you are worried about spam bots scraping your email address and other pertinent data from your Contact page, you could connect your email to Google Apps to help you filter out the junk.
Always Put the Client First
You may be noticing that all these tips have a common denominator: when designing your photography website, always put in mind the client’s needs first. Your photography website should use larger images, user-friendly so it’s easy to navigate around, and quickly respond to your client’s questions and clarifications as prompt as possible.

They should be able to know what type of professional photographer you are right off the bat, where you are based and how to reach you as soon as possible.
Keep in mind that your prospective clients do not have a ton of time in their hands to review your work, so try not to slow them down. Make your photography website user-friendly with keyboard navigation’s and on-screen buttons. Ensure that your photos are large enough to be high-quality, but small-scale to load quickly. Do not put splash pages, fancy animations, and loading bars.
Before you save any changes you make on your photography website, ask yourself first if the change makes it more convenient for prospective clients to navigate and find what they need to know. If it makes it easier, then go for it. If not, then just don’t.