5 Important Photography Lessons I Learned from The Art of War


What can a book that was written 2,500 years ago teach us about photography?

Photography Lessons and the Art of War is an ancient Chinese book on military tactics, the ideas of which have been commonly applied in the world of photography and business in the last few decades. It has been such a hit, as the information is not just about war — they are teachings of common human psychology, of fact, the psychology of competitiveness.

The Art Of War

Photographers are more competitive than you would think. Often we compete with many other photographers, or even with our subjects, but most often with ourselves. Our weaknesses, our fears, our lack of self-respect-work together to keep us from reaching true potential. But that is natural human psychology, right there in a nutshell-working to resolve our weaknesses.

As photographers, it is also crucial to know how broad the definition of art is. This has enabled us to describe our work more thoroughly as artists and has also addressed the mystery of why we feel the necessity to make images in order to display our view of the world.

Why Photography is Different from Other Art

Photography is a true technical discipline. It is part of a vast category known as Third Art (also known as Digital Art) or Seventh Art (also known as Visual Art). Yet photography is art different than that of others since it is focused on fact. The photographer employs production methods to create a picture that is an understanding of fact at the precise moment of the shooting.

In this blog, we’re not concerned about photocomposition or photomontage strategies like we said before. Such artistic methods are no longer photography but photographic. The artist uses multiple images to create a two-dimensional world, a world that has little in common with the actual universe at the time of the film. Also, if it is an understanding of the natural world, it is no longer observable. The brief moment is no longer there.

Sun Tzu has been at the forefront of art and human creativity and, 25 years ago, has given us principles that extend to all forms of human rivalry-including photography.


5 Photography Lessons

Be Prepared

“To … not prepare is the greatest of crimes; to be prepared beforehand for any contingency is the greatest of virtues.” 

– Sun Tzu

Have all your gear prepared and organized?

The best thing you can do to alleviate fear is to get prepared. Hold all of your photographic gear in one place, keep your batteries charged and your spares packed, and create an efficient way to transport everything. Not trying to search for something at the last minute would make things flow much easier.

If you have a lot of equipment, create a checklist for packing to use when you’re about to transport your equipment. Cross it out of your list as you load every item. You’re going to consider the final checklist, with everything complete, a satisfying sight in itself.

Be Patient

“He who is prudent and lies in wait for an enemy who is not will be victorious.”

– Sun Tzu

The perfect shot can allow you to sit back and do nothing for a long, long time.

If we look at photography, we may assume that great shots rely on chance, but that’s wrong. Most of the great shots are the product of cautious, strategic preparation (see: Secrets of Talented Photographers). And it’s a lot of preparation to find out the best spot to wait for the perfect clip.

Know, it’s not about taking 100 decent shots-its about taking one perfect shot.

Be Quick

Rapidity is the essence of war.”

– Sun Tzu

When the time comes, you have to be fast.

Do not compare being cautious with keeping your guard down. If the time comes, you’ve got to be able to grab it. Whether the subject runs fast, or you’re only pressed for time, you need to take a lot of short shots and forget about post-processing framing and composition.

The toughest part of being swift in photography is realizing when the time has arrived.


Know Your Limits

“He who knows when he can fight and when he cannot, will be victorious.”

– Sun Tzu

Don’t take the next step until you’re ready.

If you are just beginning photography or trying to move your talents to the next level, you need to know your boundaries. We all have them, in every aspect of our lives-it’s just a part of being human.

Although you should still be able to challenge yourself, pushing too far will always make you exhausted.

Then Move Past Them

“Opportunities multiply as they are seized.” -Sun Tzu

And when you’re ready, leap.

Then, when you’re able to take a dive, the all-too-human self-doubts prevent us from going on too much, and it’s up to you to decide whether or not the right time has come to take the plunge. When you are in doubt, jump.

Now that you have learned the lessons that Art of War has about photography, it’s time for you to set up your photography portfolio online. If you already have one, improve it!

Protecting your photography online by using a watermark is a great defense against theft. Watermarquee offers unlimited watermarking for the very low one-time fee of $19. Start unlimited watermarking today.


10 Impressive Child Photography Tips:To Snap a Bundle of Joy

Is child photography as easy as it looks?

10 Impressive Child Photography Tips

Children are always on the move and sometimes find it hard to sit still, even for a few seconds. Wouldn’t it be handy if you had a few tips to add to your arsenal so that you could easily take pictures of your subjects and come up with great results every single time? and (here are some great ways to monetize your photos).


In this article, I’m going to share with you the tips I know for capturing the perfect photos with children.

Plan the Process and Familiarize with Your Gear

Although things may get a little out of hand while photographing children, try to plan as much as you can for the photoshoot. First things first, find out what kind of equipment you need for that particular photo session. If you plan on shooting indoors, have all the photo equipment you need with you.

The light inside the house or the building might not be as great as the lighting outside, and you might need extra gear to make things work. I would not recommend shooting with it indoors if you are using a point and shoot camera, simply because point and shoot cameras produce too much noise in low-light settings.


Camera Settings

What camera settings do you need to use? Since children are fast and spontaneous, they can’t always do what you want. Set your camera to a setting where you can easily control the process.

    • Take pictures of children in the “Aperture Priority” mode. In this mode, you’ll be able to play with the depth of the field by changing the aperture, allowing your camera to choose the right shutter speed for you.
    • In low-light environments, you may need to set your aperture to the smallest number (a fast lens with a large aperture such as f/1.4 helps a lot) in order to have a relatively fast shutter speed.
    • However, if it gets darker and the light starts to fade, spike up the ISO a little. Even if the images are a little grainy, you might be able to capture a photo that’s worth the whole photoshoot. Keep in mind that it is better to have a sharp image with more noise than a blurred, noise-free image!


Let Photo Opportunities Present Themselves

Have you ever spent half an hour attempting to get a child to smile for a photograph without success? Then, a few minutes later, after you put your camera away, are you looking around to see them smiling?

Instead of setting up a scenario where you want a child to pose for a photograph, it can be a lot more helpful to let the child act more normally. In this situation, you would be there with your camera in hand, and you’d be ready to snap away when an excellent photo opportunity arises.


Get to Know Your Child Photography Subject

If you have time, try to get acquainted with the child before the photo session. Try to figure out what the child likes, find some common ground, be a friend of theirs. Don’t be another adult to tell them what to do. Stick to their level of innocence, playfulness, take their energy, and make them laugh by being stupid.

There is completely no need to ask the child to smile at the camera. Aside from having dull and fake images, you’re not going to get anything special. Let the child play and enjoy while you’re getting ready for the shot. Ask your parents to stand right behind you, then when you’re all set, either call your child or ask your parents to do it for you.

As soon as the child looks, focus on the nearest eye, and snap a picture. Remember, even without a smile, you can have some emotional and touching photographs. It is essential to build a bond with the child in order to achieve the best results.


Know Your Angles

While it is a general common rule to get down to the child’s level with a view to obtaining killer images, you can also try a few things against common rules. Snap some of the photos standing up, snap another one lying down, and snap another one sitting on the child’s level. Remember, creativity is a friend of yours.

You work with it. Try different angels; shoot the children’s clothing and favorite toys. After all, you’ve been creating memories for years to come. Sensitivity is a major part of child photography.


Choose the Right Location and Timing

Location is very important for great child photography sessions. Some of the parents let the photographer choose the location. I’m always looking for child photography venues in advance. This way, you’re going to know the good spots and plan your shots better.

While taking pictures, ensure there are no annoyances in the background. Watch for harsh objects and unattractive colors both in the background and in the environment.

Timing is another crucial factor for successful images. To avoid harsh shadows and numerous exposure problems, try taking pictures early or late in the afternoon.

Also, keeping the child comfortable is a good step towards getting a good picture. Happiness is hard to fake for adults, and children will not even try it.


Get Ready for Mood swings

Children might get very moody if they’re tired of being photographed. The kids might want to do something fun and different like to play another game or move to another location.

If you feel you haven’t had enough good photos, talk to the parents and see what other approaches you can take. Act a little stupid to cheer the child up. The last giggle you capture could be the best photo of the day.


Photographing Babies: Be Generous with Props!

One of the biggest challenges you have to face when photographing babies is getting them to look in your direction for more than a second. The best way to get around this is to make use of a prop, such as a toy or a teddy bear, and try to get the attention of the child.

But it’s worth it, though. The smiling picture of the baby is something that the family will cherish for years to come. And if you can learn how to get a smile out of your babies reliably, you will be remembered and recommended by your parents for years to come.

Go Macro

We all love newborn babies because they’re adorable and small. Although they’re cute, they’re also made up of many cute little body parts that present a photographer with an array of wonderful subjects–especially if you zoom in on them.

If your digital camera has a macro mode or if you are lucky enough to have a purpose-built macro lens, use it to identify a specific body part (like a hand, an ear, a foot, a mouth, etc.) and use it as the full focus of your shot.

Doing this emphasizes the detail that is often missed in the shots that many of us take, and you’ll find that your entire collection of photos is beautifully punctuated and can even make excellent feature shots.


Bottomline

If you are a budding photographer or just want to get the best portrait photos possible of children, you must make it interesting and fun! Making child photography sessions enjoyable means that your subjects will want to do it again, and again!

Get them involved and let them take some pictures of you, too, for a change! Show them all the photos afterwards and help them choose the ones they like best or how to edit them. Child photography is fun, but it needs a few tricks and strategies to make each session fruitful and productive.

Lastly, market your photos on social media to get new clients! But don’t forget to use Watermarquee, a premium watermarking tool online to watermark your photos so no one else can claim them!


14 Pieces Equipment Every New Photographer Needs


14 Pieces Equipment- Every ‘New’ Photographer Needs

Are you considering commencing photography as a business?

If you’re reading this article, you are probably a budding photographer who is considering pursuing your passion and beginning a photography business. You may have a tripod and a few lenses, but you wonder if that’s enough and what gear you might need to make it as a professional.

Photography is a great activity to get into, and if you’re committed to mastering the art, it can even blossom into a fulfilling career. It isn’t exactly cheap though, and with the vast number of options available, knowing what you need to get going doesn’t need to be overwhelming.

This is why we will go over all – you need to get started with photography in this post.

Although the list may sound a bit overwhelming, don’t forget that you can sometimes get ‘used’ equipment for a cheaper price-tag. Several people who move on to intermediate level will be eager to get rid of their basic gear, and this could significantly reduce your costs. Here are the best –


Equipment Every New Photographer Needs

  1. Camera

Of course, the camera is the most important piece of your equipment. Your best bet here is a quality yet affordable DSLR, and thankfully these cameras are dropping in price every day. For some $300 to $500, should enable you to invest in one. You can even save on a great camera by buying a used (but still working) one.

Such cameras take great pictures, and you’ll be able to add to it, a wide variety of gadgets, including image stabilization to help you perfect your skills. Both Canon and Nikon are popular brands that are available in a variety of different price ranges.

  1. Camera strap

Lens belts are of great use. These straps provide a safe and comfortable way to transport your camera without having to carry the entire camera pack. The surprising thing about camera belts are, there are millions you can choose from, and generally, they are inexpensive so you can buy a bunch of them to match your look. There are of course some that are very expensive, like those for expert photographers that want more than just ‘a message on fashion’.

What do we recommend? The Black Rapid Sport RRS-1BB Sling Strap is our pick for the best functional camera strap. This is perfect for those photographers who need a cushioned strap that is comfortable to wear for extended periods of time, even when they are carrying a heavy and bulky camera, getting ready for a quick, perfect shot.

  1. Camera bag

There’s no point in funding thousands of dollars in camera equipment just to put it in a dusty drawer or to bring it around in an old gym bag.

You would want to invest in something that’s durable and heavy-duty enough to make your equipment easy to hold and transport around with you.

In general, there are three camera storage options:

  • Pelican shell;
  • Backpack; or
  • Messenger bag.

While the safest solution for keeping your gear is a pelican bag, it’s also the toughest day-to-day to lug around.


For us, there is the ease of security right up there, which is why we choose to use a backpack preferably than a messenger bag over the shoulder. Another thing to consider is that if you need to access your gear quickly, or if you want to look less like you are carrying expensive equipment around, you might prefer a messenger bag.

  1. Lenses

If photographers snap very interesting shots that you can’t seem to do, it’s probably partly due to their variety of available lenses. You also have to know how to choose the right lens for the correct situation, of course, but picking up a number of beautiful lenses will help you determine which ones are suitable for each topic. Although discovering some tips can help you out, do not stop exploring both!

Nonetheless, it should be remembered that not all lenses are made equal. Usually, the models in the camera kits are of lower quality. Buying just the camera without accessories and then investing in lenses of better quality than you want would actually serve you better than a package. Here are some of the most popular varieties you could choose from.

Kinds of Lenses

  • Fisheye Lens (for panoramas, scenic images and skyscapes)
  • Macro Lens (for up-close photography –  think flowers and butterflies)
  • Telephoto Lens (far away shots, perfect for wildlife and sports photography)
  • Wide-angle lens (good for landscapes and architectural shots)
  • Wide-opening lens (good for portraits and nighttime shots)

Although lenses can be pricey; the good news is that you will not have to buy them in one go. Alternatively, pick up the type of lens that suits the type of photography you would like to do the most, and then you can gradually add more lenses to your collection later as required.

  1. Lighting

Good lighting makes for good photographs. Unfortunately, natural light situations are not always available or suitable, and you may need some artificial light sources to produce your art on film. There are many ways to accomplish this; you’ll need to decide what kind of photography you’re going to do – to choose the right lighting.

The aim is to go for bright, natural bulbs that do not make overbearing light. But you also need a system that suits in with the scenario.

  1. Lightbox setup

If you are searching in a studio for images of items or small still life scenes, then a lightbox may be the way to go. This is a small, controlled area which helps you to change the lighting situation to suit your needs. Nevertheless, it’s only suitable for a small number of applications.

  1. Manual flash

If you are filming outside, it is ideal to use a manual flash. This tool is lightweight and easy to carry, and that makes it ideal for pictures where you need to get the shot fast. If you do action shots or photography of wildlife in poor light conditions, you may benefit from using them.

  1. Continuous lighting kits

These are the studio-style kits mostly used for film shooting or still life. If you intend to shoot a series of images or clips at one location, you will use this, and you need to be able to set up the ideal lighting situation. If you are a portrait photographer or a YouTuber, then you would probably want to invest in this device.

  1. Tripod

Shaky hands aren’t good when taking great pictures, and a tripod is a great way to make things right. There are many options for this, and when space is limited, you’ll probably want to invest in full size and a tabletop version, too.


  1. Photo editing applications

Like it or not, most of the images’ elegance actually happens even after they have been captured. You will take your pictures from ‘meh’ to ‘wow’ by investing in a good photo editing suite! Even though an editing program won’t be making you a good photographer, it can assist you in getting the best out of your masterpieces.

It’ll take you some time to learn how to practice photo editing, but there are lots of free online resources. Adobe Lightroom is the most popular choice here, and if you go with this option, you’ll be able to get plenty of support. You can completely change the shot you took with these apps, or adjust it to look exactly like your eyes saw it.

Everybody involved in shooting raw images knows these kinds of photo editing apps are important. Get those programs for yourself, watch some tutorials on YouTube and play around. You’re not going to regret it.

Check out Water Marquee-it’s free for simplified needs like watermarking your pictures before you share them online!

  1. Computer

Odds are you have one of those, too. Most new computers should be able to smoothly run software and suites for photo editing. Which means you can use it to edit your images from almost any smartphone, including Mac, Windows, ios, iPad, Android, and even Linux computers.

  1. External drive

Think of a hard drive outside as insurance. Although it may not be directly beneficial at the moment, if your machine unexpectedly crashes, maintaining a gallery of backed-up pictures will give you peace of mind. That being said, any wise photographer should have one of two backups on hand.

External hard drives, apart from stability, are just plain useful. As the cameras’ output quality continues to improve, image files are increasing in size and take up more space.

Additional storage

We recommend the portable HGST Touro S Drive. The truth is there are lots of viable options out there. But, keep in mind that it is possible to fit tens of thousands of RAW image files on a single drive with an additional terabyte of space.

  1. Reflector

If you do not want to use a flash and you’re striving for more natural lighting, the ideal solution is reflectors. Reflectors reflect the light on the shadowed places, as the name suggests. Just change the reflector angle to shine a light on the dark location or subject then you’re ready to shoot some stunning pictures. These are easy to use, simpler than highlights, and the images appear more realistic because you are using natural light reflections.

  1. Cleaning kits

Debris, humidity and dust can get into the body, lenses, and accessories of camera. In the worst-case scenario, your pricey camera and lenses could be permanently damaged.

When you ignore the maintenance of your camera, then you make the costliest mistake.

And, with a cleaning kit, you will know the exact way to clean the camera gear properly. Photography involves a combination of experience, education, and talent, but as important as other things, is maintenance.

One of a photographer’s most important duties is to keep the lenses in great condition and to maintain lenses must always be on top of your list.

Keep in mind that this is a basic list. Photography is an extremely diverse form of art, and the equipment you need depends heavily on what kind of photography you want to take. If you have some favourite artists, then be sure to check their images for the feedback! Many of them are simply going to tell you what type of equipment they use to get their shots.

How to choose a perfect camera

If you want some technical tips as a novice on “how to choose photography equipment,” we’ll help you here.

Buying a professional camera is a hard decision to make. The amount you are spending on it can be costly for you. The initial step in choosing a camera relies on the budget being practical.

Then you should learn the types according to your necessity, such as DSLR (Digital Single-Lens Reflex) Point-and -shoot-Compact Mirrorless SO. The budget camera has its advantages depending on the style you select.

So there are some things you need to consider when you purchase a camera:

  • Decide your kit budget
  • Choose how often you will use the camera
  • Pick a DSLR to control the entire process of taking photographs
  • Purchase a point-and-shoot camera if you want an easy-to-use, cheap camera for portability and relatively high-quality select mirror with fewer cameras. If you wish a cheap, high-quality option, select an analog camera.
  • Select and buy a specific brand.
  • We suggest you contact other professional photographers for suggestions and recommendations.

How to choose the best beginner lens

The key part of the camera is the use of the right lens. To achieve the perfect shot, a perfect lens can make or break your shot.

Optimizing the use of interchangeable lenses on the camera will transform the pictures from amateur to professional. Therefore, you need to carefully pick your lens because not every lens fits for everyone.

We realize that the right lens will transform the whole image and also boost your ability, so here’s the guide to buying the right lens:-

Remember:     The Lower the Number, the Wider the Shot

The Higher the Number, the Greater the Zoom

Try this out before you take that card out and make a purchase!

And remember, adding creating your own watermark and adding it to your online photos provides protection against someone using your photos without your permission. Try watermarking here at WaterMarquee.

Why Watermark: Get Your Photos Noticed Amidst Covid 19 Pandemic

11 Surefire Ways to Get Your Photos Noticed Amidst the Pandemic

This unsettling time may make you feel completely derailed in your chosen career. With sessions, events, and projects cancelled or delayed left and right, it seems that your photography equipment (here’s a list of equipment every photographer needs) will continue collecting dust in the closet, and the bank account will probably be depleted. You should stay home and keep yourself and your loved ones safe from the spreading of the virus. You could sanitize, wear a mask, and keep your space clean. But other than that, you may feel like you do not have any more control over it.

Am I spot on? Well, you are not alone.

Photographers all over the globe are having the same impact on their businesses and feel like the world has been turned upside down.

There is, however, one other thing that only you are controlling right now: your action and your reaction. You have a choice in front of you: either you stay still and make the weight of this pandemic to hold you back on your photography journey, or you make a decision that this unexpected flurry of events will NOT defeat you, but instead pursue opportunities to grow as a businessman.

I know that if you are pursuing sharing your love of photography with the world, then your ambition is exactly what you need to hold onto right now. If you could somehow stay connected to your burning desire to continue to pick up that camera, and you don’t have any choice but to find the answers, you’ll thrive on that.

So, what’s the photographer to do? How do you support your photography business during this downtime?


Blog!

Review best blogging practices for optimal SEO. Now is the time to get absolutely caught up with all the sessions that you put off the 2019 blogging. Start your phone’s running list of blog topics so you could write them down as they come to you! Start blogging and brand your photos online.

Update your Galleries

When was the last time you visited all of your website galleries? Do not just add new favourites, remove those that may no longer be your finest work. Also, use the time you have in your hands to make sure that the photos in your gallery have a watermark and are protected from theft.

Brush Up Your Online Portfolio

Do you know that 97% of customers are looking online for a local business? If you do not have an online presence that communicates your experience and reputation, you might be leaving too many funds on the table!

Spend some time arranging your portfolio and building a client-attractive website that will help you drive traffic, highlight your work, and generate more leads. Also, conduct keyword research to ensure that you create the right content that will help your site rank high in search engine results and target the best prospects.

Learn a New Photography Skill

Have you been thinking about double exposures in-camera? Dying to study macro or food photography? Have you always wondered how to free-lens? Now is a perfect time! You’ll probably never have that much non-shooting time again (let’s hope), so grab that camera, check out a YouTube video, and obtain a new skill.

Finish the Family Album You’ve Been Putting Off

In today’s era of digital photography, we prefer to download our images and leave them on our computers forever. It’s time to get around to printing your pictures. You can even share it online (don’t forget to watermark them first) and spread some good vibes; the world needs it.


Work on Your SEO

I know that SEO is confusing and overwhelming. The great news is that there are several opportunities out there that could give you precise, actionable steps. My advice would be to work on adding alt text to all of your gallery photos.

Try to Plan Out a Month’s Worth of Social Media Posts

You might have time to post on Instagram every day right now, but you’re not always going to do that. Consider planning a month for Instagram posts in a scheduler like Planoly. H use them now while the pandemic is happening, have them prepared when your busy season comes back!

Consider Starting a 365 Photography Project

If you’re unfamiliar, the 365 project is a project where you are committed to taking one photo every day for a whole year. There is no stated law that you need to start on the 1st of January. Now is the perfect opportunity to get into the habit of shooting every day. Not only do you have a lot of time with friends and family, but the days are getting longer, and there is plenty of daylight after business hours.

Update Your About Page

Use this new self-portrait or another recent photo of yourself and update your About Page! Had a baby? Have you moved here? Have you taken up a new hobby? A new pet has been adopted? Get your personal information and tell your potential customers about it.

Watermark Your Photos and Brand Your Photos Online

During these trying times, some people resort to desperate measures. Your photos are not safe from getting stolen. The unfortunate reality of the internet world is that photos and other content are thriving misused without proper authorization from their respective owners. Nothing will ever protect your material from being stolen by committed photo thieves; you could only discourage them.


Use this downtime to go through your collection and make sure that your photos are protected by using an efficient free watermark maker like Watermarquee. Moreover, not only will watermarking protect your photos from theft, but it will also help brand your photos online.

Use this downtime efficiently. It is a good idea to put your photos through a watermark maker and put watermarks on them before posting them out on the internet. Watermarquee is a great online watermark maker that can help you protect your images from getting stolen.

Submit Photos for Publication

It is a lot easier than you might think to get your photos published and noticed if you implement a few important steps.

First, recognize an established publication that fits well with the kind of sessions you’ve been photographing. You could usually find the guidelines for photo submissions and timelines on the website, and you would want to follow those steps accurately as they are presented. This could mean enhancing your photos, re-sizing your images, or submitting only a specific set of images.

Remember, to protect your images before publication of your photos with your own watermark. Unlimited watermarking is available for a one-off fee of $19 with Watermarquee.

Bottom Line

Everyone probably has a little extra time on their hands right now. You don’t have to fill it with endless tasks. Taking a second to breathe and relax could do wonders. It might give you a new project idea to handle in the next few weeks. Meanwhile, to help your funds keep up, here are some of our tips on how to monetize your photos.

All of these current rules and changes can be frightening, so it is very important to keep in mind that things are going to get better, and people are there to help. Try to follow all the rules and guidelines as best as you possibly can. Every little bit helps.

Free Watermark Creator – 7 Useful Tips

7 Useful Tips When Using a Free Watermark Creator

Why is it wise to use a free watermark creator?

We all love to post our images on different social media websites, and we are thrilled when they get a good response.  However, whenever you post an image without a watermark, the chances of it getting stolen increase; therefore, it is crucial to add a watermark to every picture you upload. Whether it’s a meme you made or a photograph you meticulously took, adding a watermark using a free watermark creator will deter potential image thieves from stealing your work and claiming it as theirs.

How Simple is It to Use a Free Watermark Creator?

A watermark is a faint text or logo that is placed on top of the photo to prevent it from being used without your approval. Learn how opaque or translucent your watermarks should be in our cheat sheet! It will always have the name of the person who has the right to the image so that you can contact them for information on how to obtain the original copy of the picture.

The watermark can also take the form of a copyright logo. It only makes the user aware that this photo is copyrighted and should prevent them from using it without authorization.


Photography Watermark Design Tips

A boring, dull, and sometimes just distasteful watermark design can prevent people from hiring the services of even the most talented photographers. What’s the ideal watermark design, and how do you make?

  1. Pay Special Attention to the Colors

Choosing colors is the most critical step of its design. It should match the general idea of the brand and be linked to the photography niche in which you specialize. Use black and green for landscape, white and pink for weddings, blue and grey and for product photography, etc.

  1. Visualize

The colors used should draw attention, but at the same time, should be universal. When choosing a photo for a watermark design, think about how it looks in grey. You could also try to make a variant in light and dark only.

According to expert photographers who also use a free watermark creator, it is better to make several versions with various color schemes that can be used for specific applications. That’s why famous brands usually stick to a simple range of less than three primary colors. They also use solid colors rather than gradients.

  1. Avoid Using the Same Ideas

Of course, it is useful to study the main trends in the field of watermark photography designs. It helps keep you up to date with all the new trends and styles, and it inspires you to create your own designs. However, using the same clichés will make your watermark design monotonous and hackneyed.

There are some great Ideas in book like these.


  1. Make It You and Unique

The key to the success of the watermark design will be its originality and a touch of your personality. The more the design of the watermark will stand out among your adversaries’ grey monotony, the more clients it will attract.

Let your creativity flow and present your work in incredible and memorable ways.

  1. Trial and Error

Don’t start working with the first idea that came to mind (you’ve already seen it somewhere). Sketch a couple of rough drafts and develop one of them.

  1. Choose a Suitable Font

The font type on the design of the watermark is also an important aspect that’s often overlooked. The improperly selected font can spoil the entire impression, or even distract attention from the slogan or title. Custom type is an excellent option to retain the identity of the watermark design. Likewise, mind the font size and make it readable.

  1. Make It Simple

It is not necessary to invent something extraordinary to have an original and awe-inspiring design for your watermark. As a rule, it is difficult to remember complicated watermark logos or designs. Keep in mind that a good watermark should be easy to remember and associate with your brand. Its simplicity and ease of understanding distinguish the design of a good watermark.

The design of Apple’s watermark is an excellent example of this powerful approach. Everything is elementary, but at the same time, it’s extraordinary and fantastic.


Using Water Marquee, A Free Watermark Creator

Watermarquee is a free and efficient watermarking photo tool that works in your browser. There is nothing to download or install, making the watermarking process easy and convenient.

Free Watermark Creator - 5 Useful Tips


This online free watermarking creator allows you to design your own watermarks or use fully customizable templates to guard your images.

The process of adding a watermark to an image with Water Marquee is remarkably simple.


  1. Visit https://www.watermarquee.com/
  2. Click Start Watermarking For Free.
  3. Click Select photos to watermark and upload the photo you wish to watermark. Please remember that for this application to work, the picture must be smaller than 3MB.
  4. Once you have uploaded the photo, there is an option at the bottom of the page where you can choose to add either logo or a text to the picture.
  5. You upload the text or add a logo to the image. You can edit the size and transparency of the watermark text or logo using sliders that pop up on the screen.
  6. Now you just need to download the image, it will automatically save as a .jpg, and your good to go!

Go Pro!

Incredibly easy, isn’t it? The Pro version of Watermarquee is also great if you plan to watermark a bunch of photos at once. For only $12, you can add both texts and image watermarks to the same picture, to upload any size image, upload an unlimited number of photos and watermark them at once, and to upload any format of the.


Closely related: Watermark Creator – 5 Secrets not to miss.

Watermarking Photos: Cheat Sheet for Photographers

Ultimate photographers guide to watermark photos

How would you feel if you saw your visual masterpiece being claimed by someone else as theirs?

You’ve worked hard for that perfect shot, that perfect photo, only for someone to steal your credit…and your limelight.

With today’s digital technologies, it can be hard to keep tabs on your photos and images from being shared online without due credit for you – that is, without watermarking.

Watermarking can help protect your photos online

To help you make yours stay yours, you can watermark your files first before sharing them online!

A watermark is a message in the form of a stamp, logo, or signature that can be superimposed onto an image that you have created to help protect it from theft.

It’s simple – and your watermark photos or images can be generated online right in your browser. At WaterMarquee you can create your watermark online quickly and easily using absolutely FREE watermark software— Yes, it’s done right in your browser. That means you do not need to buy, learn and upgrade any special software.


Watermarking Photos – Guarding your art against theft

Watermarks are a great tool to reduce the chances of someone taking your images, photos, or logo and using them unscrupulously without your permission.

Your creativity is something that you want people to see, appreciate and know that it is yours. By using the same watermark on all your images and photos, a watermark could become your ‘brand’ or signature.

It can also contain some of the metadata information on your images or photos when it is downloaded. Just make sure you put that information in the metadata name and description.

Double protection

You have more protection on your properties by using both the watermark and metadata tags. Try using a watermark with your name or website. Just ensure it’s included in the metadata as well. The shot, for instance, is a swing on the porch. The metadata could be a porch swing with information about the date and the website.

How can watermarking help enhance your brand?

Enterprises such as Coca Cola and Visa use watermark logos for their merchandise or services. You will see them on everything from their letterheads to sales sheets. If you are going to use your company’s watermark logo, you need to make sure it’s the right logo, one that’s best suited to your market. Is it something that suits the company? If you are a vegetarian food photographer, you won’t want to use an ‘auto’ logo.

Is it built well; the right colors, the right font? The logo may be the name of the company, or it may only be a clip art image, but it should be something that is readily identified with the company, no matter which one you choose. Can people instantly recognize it, because they know that it’s the product mark when they see it?

Are all watermarking services made equal?

No, but choosing the right watermarking service is not as hard as you might think. It is knowing what you need when it comes to watermark photos, logos and images. You need to consider the size of the photo or image an online watermarking service allows you to upload. How many pictures or images you can watermark at one time. Some sites only allow one at a time with a free account.

What does Watermarquee offer that others don’t?

With Watermarquee there’s no need for installation, it is easy to use, and is customizable. The service provides a genuinely free edition, as well as a ‘ Pro’ WaterMarqueea Premium option. It is easy to use and offers watermarks for text and logos. The font, its size, and color can be changed. Templates can be used to render the watermark. Upload the symbol, so that you can likewise watermark it.

With the free version, you can watermark five images at once, so it takes less time to get them finished. The’ Pro’ version (a paid version) can accommodate unlimited numbers of photos. There are other sites out there which can be used to watermark the images online.

Compare the features, ease of use and quality first before you take the plunge and bring out your credit card. Water Marquee is one, if not the most, hassle-free and efficient watermarking service.


Will watermarking compromise the quality of my work?

Some are hesitant to watermark their images because they feel like they are compromising the quality of their works. The truth is that if watermarking is done right, it could even add value to your photos, especially if you plan on selling it. Customer support is a vital consideration, especially for newbies. You’ll want a company that’s fast and helpful in providing support. If you have never done watermarking or used a watermark maker before, find a site that offers tips or guidance for beginners.

What are the costs?

The cost is one of the essential factors to consider when choosing a watermark service. Do they have different cost-based packages, require a monthly fee or an annual fee or merely a one-off lifetime rate? Should you go for “free” services? After all, why pay for something that you can get without costing a penny? Well, free services usually only offer limited watermarks. However, our watermark service offers outstanding customer service, multiple images to be watermarked at once, and consistent completed watermarked pictures, all at the very reasonable one-off lifetime fee of $19.


The ultimate guide to choosing the best watermark maker

It could be confusing how to choose the right watermark service. It will take – on your part to make some effort. What to look for in finding a watermark maker is half the battle. The other aspect is the versatility of the watermark producer.

In addition to knowing what to look for in a watermark service, you need to know what kind of watermark you will use. It could take you a little more time and effort. It depends on which type of product or service you provide and how often you take pictures, pictures or other items with a watermark.


Remax uses a very low Opacity – to add their watermark to every Image

A realtor, for example, may use watermarks more often than a business offering products or services. Each photo that a realtor uses on the internet can be marked with a watermark.

So you have selected the best watermark, now how do you choose the best watermark maker? Do you know what to look for? Let’s think about some essential things for you to consider, about a watermark service.

Essential elements in choosing a watermark maker

  • Ease of Use

You want to find an easy to test and use watermark supplier.  Ask, do I need a professional device installation? Don’t waste time installing software in your device. Life is too short!

  • Batch Watermarking

Look for a watermarking maker to watermark more than one object or picture at a time, so that you can complete the job more efficiently.

  • Features

You want to be able to change fonts, colors, opacity, and other features – easily.

  • Upload

Search for a watermark creator to upload multiple images. Could I directly create a Watermark in my browser, or will my pictures be saved on a different server?

  • Saving and Downloading

It should be easy to edit and save–so you can still come back and modify the watermark you created.

  • Support

You need to make sure that excellent user assistance is available.

  • Added Value

The quality is an important consideration, depending on your budget. Does the watermarking service offer a FREE version –such as https://watermarquee.com/

Should I require additional functions and switching to a paid service later – does it provide unlimited use–or can I pay a one-off lifetime price? Must I enter my email information if I choose the FREE Service–to trigger a barrage of unwanted emails?

WaterMarquee provides a batch watermark; customer support; both free and premium paid accounts; and is simple to use. It’s easy to save and download your watermark. Templates are also available to use. This helps you to change the font, color and opacity you want to use.

Start with the free service and check it out, then you can go to the premium’ Pro’ account; by paying a one-time fee of less than $20.00.

  • Check how they charge

While some online watermark websites charge an on-going monthly fee – you don’t have to pay it.  Watermarquee Pro offers you a full watermarking service for a one-time fee of just $19.

So, you’ve decided to sign up with Watermarquee — Great!

Congratulations! That may be one of the best decisions you’ve made in your professional career!


TIPS to ensure the Perfect Watermark

If you’re new to watermarking, we’ve got some tips to help you make a beautiful watermark.

  • Watermark the ‘final’ scale/size images

Make sure the file scale size is the ‘finished’ size you’ll use before you apply the watermark

If you mark the full-size image – then – scale it down – the watermark may be too small to be viewed or read. You want people to be able to read it.

Sizing the images to the finished size before the watermark is added removes the watermark from becoming so small it cannot be seen.

  • It’s time to upload your photos

Upload all the photos, including the logo that you’ll be watermarking. Choose one of your pictures to focus on, add your logo or text, or both, in the online editor.

  • Designing your watermark

If designing your watermark, remember the viewer. Place it where it CAN’T be sliced easily but does not draw the viewer’s attention to the watermark – but rather allows the focus to be on the picture subject.

Ensure the logo and text are readable and accurate. Try to keep the watermark hidden, so that it does not appear explicitly, but does not disappear entirely into the background. The object of the watermark is to preserve pictures; if not seen, the image cannot be saved. But, if it is too bold in appearance, it distracts the attention from the photographic subject.

Remember to Save Your Image with Your New Watermark

  • Use an opaque or ‘semi-transparent’ watermark

It allows the viewer to see the entire photo, but still, the watermark will be visible. If your color is dim or earth-coloured, use white or light grey for the milky watermark, but use a dark grey or black misty watermark if it is a vivid backdrop such as yellow or green. The contrast will help to make the watermark noticeable without disturbing itself and helps keep the attention on the composition and not on the watermark.

Your work is what you want to be noticed; the watermark is only a protection device for your work.

  • Location, Location, Location!

Place your watermark on the part of the image that won’t distract the viewer’s attention yet will still be challenging to remove.

A staggering 85 per cent of people use the default ‘Top Left’ position to place their watermark-when they could have dragged it manually to a different location.

Most people can skip the importance of finding the perfect place for their watermark on their images. Go and have a try for free at Watermarquee to watermark photos and see for yourself how easy it is to move the watermark around.

The position of a watermark may depend on the reason why you’re using a watermark. There are mostly two driving factors why you want to shield your pictures:

  • You’re selling your photos; or y
  • You’re stopping potential unauthorized use of them.

In this shot, you can still enjoy the gallery by putting the watermark logo in the centre. It is essential to make copying your work impossible for anyone by making the watermark very clear.

  • Watermark all your photos, not just the high-resolution images

You may be able to set up the Copyright Information setting in the device configuration menu depending on your computer; however, do not focus on this option alone as it can be removed from apps or social media sites such as Twitter. With the 1,000s of images posted, social media sites are an excellent marketing tool; preserving your photo is vital.

  • Check the font to be used in the Watermark Logo

Check the font for the text to make sure it’s easy to read. Some of the fancier fonts can be difficult to read when they’re tiny or blurred, so it’s always good to test the font until you make the final watermark. It also makes cropping out of the picture more complicated. It means it is less likely that people will use it for their own needs. Remember to put the watermark in an area which makes it more challenging to cut it out of the picture or paint it over.

Watermarking Bottomline

Watermarking services can help protect your photos and images from theft. Having a watermark that is your brand also makes your work easily recognizable. Nevertheless, it is your choice whether you choose to watermark or not.

You can use a watermark online service such as WaterMarquee to make watermarks on your photos in batches so it takes less time. Watermarquee offer free and paid services have many features and excellent customer support. The site is easy to use – to make your watermark – hassle-free to save.

You probably have some watermarking questions, so we went ahead and, based on the frequently asked questions we receive, we have pre-answered them for you. You’re welcome!

Is Watermarquee really free?

Yes – WaterMarquee offers a free watermark software version. The FREE service doesn’t cost you a penny to be able to use it.

There is no subscription service – we won’t even ask for an email address. It is all done right in your server. When you get a chance – Go on – Give it a go!

The ‘cons’ are that you can only do 5 images at a time, and the free version offers only a limited number of fonts and colors.

The Watermarquee Pro – ‘paid’ version ($19 Pay once, use Forever), however, offers an unlimited number of photos or images, more fonts, colors, and even more templates and other tools. Get the most for your buck!  People from all over the world – think so.

What should I use as a watermark?

Again this is your choice, but you should think about it carefully and make sure it is something you can live with for a long time—if not permanently. Artists sign their work; even photographers can sign their name as a watermark. Whatever you choose, you need to be sure it fits your work so later you wouldn’t want to change it.

The more you change it, the more confusing it is for your clients; you’d want people to see it an immediately know and recognize that this is your work.

Can I watermark more than one photo or image at a time?

Generally, yes you can, but how many at once depends on the software you are using. WaterMarquee does five at once for the Free version and unlimited for the Pro version.

Where should I put my watermark?

When placing your watermark, to put it in an area that is not easy to remove; for instance, place a part of it on the object of the photo and part in the background. If the object is a person, however, you may put part of it on an arm or leg and the rest in the background area.

Is a paid watermark service worth the price?

That depends on how many photos or images you need to watermark. If your budget does not allow you to purchase it or you just wish to save money, then you may opt for the WaterMarquee free watermark service and wait for your business to grow.  It’s a great option for those photographers just starting out.

Is watermark also copyright?

A watermark helps identify your work, but it isn’t true copyright. It can help prove the work is yours, though.

Is there something else along with watermarking my photos- to help protect them?

Yes, if your camera has a copyright feature – ensure that it is on!  Don’t forget to also add important information like date, time, and name to the meta-description of your image.

If your question is not answered here (sorry!), you may send our awesome team of customer support agents your concerns, comments, and suggestions, and they will get back to you quicker than you can say:     “Hey, those are my photos!”

See also: Watermark Protection: 2 Ways Watermarking Can Help Avoid Vacation Rental Photo Theft.

See also: Protect Your Images Online with Ease Using WaterMarquee.

See also: Free Watermark Software – 12 Most Common Questions.

Photography Mistakes That Make You Look Amateur

Photography Mistakes That Make You Look Amateur

Photography Mistakes That Make You Look Amateur, previous blog posts here tried to give some tips on how to take better photos. Now, on the other hand, here’s what you can’t do. Making these mistakes is a sure-fire way to take mediocre photos.

Cluttered Photos

Professional photographers know that there is less (Secrets of Professional Photographers # 2), and a photograph with too much going on is a sure sign of an amateur. In a cluttered photo, the eye bounces from subject to subject and leaves the viewer unsatisfied.

Instead of trying to take it all in, just take one thing and do it well. You can take more than one photo of a location, so take your time to get each one right.

No Sense of Scale

Photography is two-dimensional and often lacks a context-so it’s up to you to give it some. A photo of an amazing building or mountain doesn’t look almost as impressive unless the person watching the picture understands how big it is. Putting a person in the image helps the viewer infer the scale.

You can add a context by demonstrating a sense of scale. Putting a person in a photo, or an everyday object like a bicycle, helps the viewer understand what they are seeing.

No Clear Subject

Before you take a photo, you need to quickly decide what’s important in the image and make sure you frame it in the best light possible.

If your subject is only a small part of the image, or if your photo doesn’t seem to have a subject at all, don’t take a picture. Wait a few seconds, think about it, and try again.


Shooting in JPEG

Just do not do it. Shoot in RAW. These days, memory cards are so cheap. If you are going to go through all the effort of trying to study photography and make a great photo, then there is just no excuse.

You want the best image quality possible, right?

You want the freedom to make more post-editing adjustments… right?

You want to future proof your photos… right?

Good, shoot the RAW.

Do you think all the pro photographers are shooting RAW?


Over Editing

We are all guilty of that. As we learn our own style and what makes a great photograph, we all tend to overdo it a little in the post-production process. For me, it was a dissatisfaction with the photo itself and a misconception that I could make a mediocre photo better through the editing process.

Yes, Photoshop and Lightroom are effective tools that can make a photo even better. In most cases, it is a better idea to try and get the camera right first.

Every extra moment you spend working out, your photograph is an hour or more saved in editing.

Most of the time, I get into trouble trying to fix something in a photoshop because I made this next mistake.

Always shooting from eye level

Frequently, interesting photographs come from interesting angles. If you take a photo of a boring scene, changing your point of view can make it much more enjoyable. Getting low leads to a much more interesting picture.

Get down on your hands and knees, climb the ladder, or look for a higher natural vantage point. Whatever you do, think about what your subject would look like from another angle.

Rushing the shoot

Time is money, right? It can be hard to remember everything you need to and want to remember when you’re in the moment and trying to capture the perfect photo.

How many times you have been browsing through your photos from a shoot and thinking, “Dang, if only I’ve taken the time to slow down and do this …” I’m guilty of being charged.

Ideally, we’d always have time to plan our shots thoroughly, create a list of shots, mood boards, lighting tests, etc., but the reality is that we often do not have time.

Even when time is short, I like to go through a mental checklist and think about things like composition, exposure, lighting, motion and posing. In photography, there are so many factors. I like to get a safe shot (the one I know is going to work) and then explore from there as time permits.

You can take this too far, of course, and be guilty of it.

Poor composition

There are some basic rules of photographic composition that you should follow (unless you have a good reason not to do so). I wrote earlier about the Rule of Thirds, the Golden Spiral, and the Golden Triangle, and those rules of composition are good ones to follow.

Subject centred and looking away? Not good. Off-centre, looking at you, and from an interesting point of view? It’s brilliant.

In addition, if your subject is a living thing, try and capture it by looking at the camera with a glow of light in your eyes, or capture it by interacting with something else so that your photo has a sense of movement.

Overshooting

It is possible to take to a lot of photos. This typically happens because the photographer just does not know what to do or what might work. They think that if they only take a metric ton of photos, at least some of them will turn out.

Do not do this. It is better to use the time (and memory space) to work the problem. Experiment, but only make incremental changes to one or two variables at a time.

What don’t you like? Is the image too dark? Do one thing to make it brighter. Exposure is good, but you don’t like the composition? Try a different pose before changing locations. You get the idea.

Being Unprepared

If you practice photography professionally (meaning you get paid to do it), then you are likely already aware of the importance of a pre-shoot gear check. That’s where you check everything in your camera bag and make sure everything is in working order, batteries are charged, memory cards are empty, and all your essential parts are accounted for. I even go so far as to fire off some test shots before I leave the house just to make sure.

It is a good habit to get into even if you’re doing photography as a hobby or a part-time pass time. There is nothing worse than getting to a location and missing a shot because you forgot a memory card or your battery is dead. I’m always losing those blasted tripod plates.

Missing Focus

If you use autofocus and let the camera choose your focus points, it is highly likely that from time to time, especially when using a shallow depth of field, you will focus on the wrong part of your image frame. That is something that, after the fact, is either impossible or difficult to fix, so it is crucial to nail your focus in the area. A simple way to guarantee accurate focusing is to use the spot autofocus mode of your camera to select your focal point. Make sure your focus is on the eyes of the subject when focussing on portraits and people.

Shaking Frame

If your photos turn out to be blurry or slightly unsharp and you are not sure why it is because you use shutter speed too slow. The shaking of your camera can lessen the sharpness of your image when your shutter speed is too slow. A thumb rule to help prevent this is to use a shutter speed, which is at least equivalent to the focal length of the lens you are using.

For example, if you are on a full-frame camera using a 50 mm prime lens, the slowest shutter speed you can use without shake is 1/50 of a second. On an APS-C (crop) sensor camera, this becomes 1/85 of a second, as the lens ‘sufficient focal length is multiplied by 0.5. If you are utilizing a zoom lens, you will have to pay attention to the focal length you are using as you try to zoom in and out.

Blown Exposure

While shooting in RAW will give you lots of latitudes to adjust your post-processing exposure, there are definitely limitations to what you can do. The shadows will be grainy and discoloured if your exposure is too dark after you bring them up in processing. If the exposure is too bright, your highlights will be blown out, and when processing, the detail will not be recoverable.

If you have a view with a high dynamic range including some very bright highlights and dark shadows, a general rule of thumb is to slightly underexpose to preserve details in the highlights while not obliterating the shadows, and then brighten the shadows in post-processing.

 Awkward Posing

Like most people you will be working with likely won’t be professional models, they probably won’t feel all that comfortable posing. And while finding poses online is great and trying them out, people will probably feel awkward, just being told how to stand up, which will come through in your images. Your best bet is to work on the poses as basic guidelines and then focus on making your subjects feel comfortable by engaging them with eye contact and friendly banter while encouraging them to have fun and to be themselves.

Distracting Objects

A good portrait can surely be ruined by having a vertical object like a tree sticking straight out of your subject’s head. While you are more likely to focus most of your attention on the pose and appearance of your subject, it is likewise important to pay attention to the background and ensure that there are no distracting elements that grow out of or cut through your subject, even if they are very out of focus.

Confusing Composition

It can take some time to figure out how to arrange the elements within the frame of your camera. When you don’t know what you’re doing, creating the breakfast composition of a dog is easy, which will cause the viewer to get completely lost and confused when looking at your photo. Fortunately, there are some straightforward guidelines that can help you manage and arrange human perception-based elements in your frame, such as the rule of thirds.

Pro tip: Using your grid overlay in processing, you can often crop portraits to third party rule.

Overzealous Processor

When you learn to do post-processing on images for the first time, it can be easy to get so excited that you overdo it. One common mistake beginners often make when processing is adding too much saturation and sharpening to images, resulting in photos that look overdone and totally unrealistic. Another beginner processing error is extreme HDR processing, which robs images of their shadows and highlights, making them look unreal at best or, at worst, just horrible.

Spray and Pray

Another popular technique among new photographers (and some older ones, too) is to just shoot tons of images in hopes of making a good one. This method is called “spray and pray,” and it rarely does much to help the cause. The reason it does not work is that a perfect shot takes some consideration and thought – and there simply isn’t any in the spray and pray method. It gets you more images, but frequently more of the same.

Not Doing Post Work

Sometimes the shots you see from other photographers look as good as they do because the photographer did a lot of work on them. In fact, it is most likely that any shot that has been recognized has had some kind of work done on it.

Some photographers insist on getting everything perfect in the camera – and some genres demand it – but a lot of photography does not depend on that kind of realism. If you are searching for a very distinct look at your shots and do not see it in the results, perceive what needs to be done in a post that might be able to raise your shot to that level.

Now that you’ve got the best photos, remember to protect them from being used without your permission with a watermark. It’s easy, so start watermarking today.


Worth a read: Making Money from Stock Photography: 10 Best Tips to Prep Your Photos.

Kung Fu Movies Taught Me 9 things About Photography

As a teenager with an off-kilter sleep/wake cycle, I watched a lot of old Kung Fu movies when I was up late at night.  They’re corny, predictable, and the acting isn’t very good, but they’re always fun to watch (and usually a good cure for insomnia).

You’d be surprised at what they can teach you, even something like photography.

Training is Key

Many Kung Fu movies begin with a boy of no particular note, who finds out that he is destined to defeat some immensely powerful evil.  But first, he’s going to have to train his body and his mind to be as solid as a rock.  The Invincible Shaolin movie has some great training scenes, like this one.

You don’t have to do a rock pushup on your back, but training and practice are essential for a photographer. You’re going to need focus and discipline, and most importantly, you’re going to need a plan.

Sit down and write down a list of the expertise you want to learn, and then figure out how to get that knowledge.  You can learn a lot from Google, but eventually, you will need to begin taking pictures and discover what performs for yourself.

Or, read some books, and you can consider taking a photography class, which will lead us to the next lesson that Kung Fu’s movies have taught me.


Old Guys Can Kick Your Ass

Old Masters have always been given a lot of respect in Kung Fu movies, and with good reason.  Though they may be old, they’re still fast and strong, and more importantly, they always seem to know where the next punch comes from.  Since they can predict your next move, they are always one step ahead of you.

New photographers can learn a lot from old hands.  They have been thinking about photography for a long period of time, finding out what works and what does not, and you can learn a lot by hearing their stories and looking at their photos. Taking a class from one of them, or just finding a mentor, can take your photograph to a whole new level.

Eventually, You’re Going to Get Kicked in the Face

The hero in the Kung Fu film always gets his ass kicked at least once so that the audience has some doubt as to whether or not he will be able to win in the end.

Sooner or later, you’re going to go through the same thing (hopefully just metaphorically).  You’re going to drop that expensive piece of equipment, you’re going to miss the perfect shot that you can never recreate, you’re going to get told that your photos aren’t good.

Just remember, it’s not that the hero’s never going to be beaten-they’re going to be beaten.  But they’re always going to get up again.

Heightened Sense of Awareness Goes a Long Way

With martial arts, there wasn’t a load of technical gear to rush out and buy. I had pretty much what I needed from the start; arms and legs! What each of the arts taught me was how I could use my arms and legs to create speed and power.

Each of them seemed to approach this completely differently. Maybe that is because there is no ‘one’ way to do it?

As with photography, once you’ve got the tools, you’ve got to find your way. Each teacher will have his or her own approach and style. Yes, your teacher can lead you so far, teach you the basics, but there’s a point where you have to become your own master.

With martial arts training, you suddenly become more aware of your peripheral vision. Your eyes would always be looking and seeing. Your mind is going through different battle scenarios. Your body was well-positioned and relaxed.

By being aware of this, you have been able to remain calm, composed, and ready for action. A well-established mind will also help you in all aspects of photography-when your gear goes wrong (and it will), when things don’t plan or just show you know what you’re doing and you’re in control.


Know Your Opponent

By knowing your opponent, you have a better chance of beating your adversary. Apply this to the knowledge of your subject matter, each medium comes with its own challenges and skills set.

Understanding how to take pictures of different subjects will help you determine how your final image will look.

Punch Through Your Opponent

From boxing to Jeet Kune Do, they are all teaching you not only to hit your opponent but to punch through them. I saw firsthand, that when photographers put the camera up to their eyes, suddenly flashes come on, and you concentrate solely on your subject, and you tend not to’ see’ what’s in the frame.

By ‘punching through’ you’ll save hours in Photoshop as you take a minute to look past your subject to see what interruptions lie in the background or at the edge of the frame.

Use Only that Which Works

Yes, there are’ rules’ to photography, but you are not likely to break new ground unless you try to push the boundaries once in a while and understand how and when to break the rules. Be adaptable to that. Keep your mind open when shooting and experimenting with different techniques.

50 Gangsters, to fight? No Problem.

Learning to be a great photographer takes time, and there are no shortcuts.  It takes practice, study, and hard work, but it is a workable goal.  Do not try to become a master in the night.  Instead, set a few short-term goals on how to improve your photography and work with it.

The Good Guys Always Win ….. in the End

Which brings us to our last Kung Fu film lesson.  Their girlfriend was kidnapped, their town burned to the ground, their father /teacher/old master died-but the hero of the film makes it to the end, overcomes the bad guy, and saves the day. It is every single time.

And in the end, you are going to be one of the Ancient Masters.

Remember to start unlimited watermarking today with Watermarquee today. You’ll be a master in now time!

Golden Ratio Photography

Golden Ratio Photography Takes your Photography to the Next Level Using the Golden Ratio

Do you want to take your photography to the next level? Are you frustrated that your photos just don’t look as good as other photographer’s? Then it’s time to try golden ratio photography by mastering a technique that’s easy to learn but difficult to perfect – the golden ratio.

Never heard of the golden ratio? Perhaps you know it by one of its many aliases: the golden mean, phi grid, or the Fibonacci spiral. Regardless of its name, the golden ratio refers to a composition technique that can be applied to your photographs with the goal of creating a naturally striking composition, known as golden ratio photography. It utilises leading lines, vertical lines and many basic photography composition techniques, in conjunction with mathematical theory in order to create a natural, perfectly balanced and visually appealing final product.


What is the Golden Ratio?

Golden Ratio Photography

The golden ratio is a ratio of approximately 1.618 to 1. Artists, architects, and musicians have used it for centuries, but it can also be found throughout the natural world. To create golden ratio photography, you simply arrange objects in your composition in such a way that they fit within the structure of the golden ratio.

Golden Ratio PhotographyThe Golden Ratio is Everywhere 

The golden ratio is very interesting because it isn’t inherently unique to photography. We can visualize it in almost every aspect of life, from the human body to famous works of art, and everything in between.

Although the mathematical concept it derives from existed independently of humankind long before recorded history, artists started using it as a basis for compositions in the 1500s. Renaissance artists began calling it the “golden ratio” or the “divine proportion” because of its ability to achieve balance and beauty. This was also in thanks to the mathematical theory where the golden ratio is based – the Fibonacci sequence.

“The Fibonacci spiral became an essential tool for renaissance artists who wished to create visually appealing compositions within their art.”

 The Fibonacci Sequence and the Golden Spiral

Fibonacci Sequence

Leonardo Fibonacci discovered the Fibonacci sequence around the year 1200. It is a sequence of numbers that begins with 0 and 1 which the mathematician observed in day-to-day life. The sequence begins by adding 0 and 1, the first two numbers, together to get 1. Each number after this in the sequence is the sum of the two numbers that precede it, so the sequence goes: 0, 1, 1, 2, 3, 5, 8, 13, 21, 34, and so on.

Fibonacci Spiral

The ratio of any two successive Fibonacci numbers is very close to the golden ratio, which is approximately 1.618034. Artists then used this ratio to create the Fibonacci spiral, or golden spiral, a visual diagram which uses the Fibonacci numbers to create a grid with squares representing the width of Fibonacci numbers. This spiral was found to appear within nature and life in countless places and became an essential tool for renaissance artists who wished to create natural curves and visually appealing compositions within their art.

The Phi Grid and Divine Proportion

Divine Proportion The Phi Grid and Divine Proportion

Given the renaissance artists’ penchant for making everything biblical, they gave the Fibonacci sequence and spiral a new name to fit in with their beliefs, the “Divine Proportion”. It is based on the ratio of one object to another as defined by the number 1.618. For example, if you take the length of a rectangle and divide it by its height and it equals 1.618, the rectangle is called a “golden rectangle” because the lengths of its sides are in the golden ratio.

Phi’s Number

This number is also often referred to as “Phi’s number”, named after Phidias, a Greek sculptor who lived around 490–430 B.C. The ratio was so named because it was believed that Phidias made deliberate and intricate use of the Divine Proportion in much of his work, including the Athena Parthenos in Athens and the Statue of Zeus at Olympia.

Phi Grid

The phi grid became the next iteration of this concept and is effectively another way to visualize the golden ratio. Rectangles can be superimposed over an image in a grid based on the 1:1.618 ratio. This “phi grid” divides your scene into thirds, both horizontally and vertically. But unlike the more popular rule of thirds, the centre lines in the Phi Grid are closer together. This moves the more important elements of your photo closer to the centre and creates a different and arguably more advanced version of a simple rule of thirds composition.

Divine Proportion, Phi Grid and/or Golden Ratio

Divine Proportion, Phi Grid and:or Golden RatioUse of the Divine Proportion, Phi Grid and/or Golden Ratio is all around us. While knowledge of its existence has been confined to more specialized disciplines, it has slowly gained some mainstream recognition. For example, some suggest that Leonardo deliberately used the Divine Proportion in almost every aspect of his work including such paintings as the Mona Lisa and The Last Supper.

Throughout history, however, it has been speculated that the golden ratio is prevalent in every aspect of our universe—from the natural growth pattern of the nautilus seashell to the pyramids of Egypt, and the musical compositions of Mozart and Beethoven.

The Divine Proportion is now more than not represented by the “golden spiral”. This is the name popularised by artists and sculptors who use the tool to achieve remarkably accurate proportion and aesthetic composition, and is what the concept is now referred to in common art theory.

In the golden spiral, the ratio of the length of the side of each square to the length of the side of the next smallest square is in the golden ratio; the rectangles formed by the combination of squares are golden rectangles; and at every quarter-turn, the spiral gets wider by a factor of Phi.


What About The Rule Of Thirds?

A Simple Version of Golden Ratio

The Rule of Thirds is effectively a simplified version of the golden ratio, a common compositional technique that divides your frame into an equal, three-by-three grid with two horizontal lines and two vertical lines that intersect at four points. The Rule of Thirds places your photography subject on the left-third or right-third of the frame, each sitting on a vertical line and at least one horizontal line to create a pleasing composition.

Rule of Thirds GridRule of Thirds Grid

The reason this tool is so effective is because of our biology. The human eye gravitates toward points right beyond the centre of a photo, points which are called the intersecting points on a Rule of Thirds grid. As people read text from left to right, they also read images in the same direction and as a result, the bottom right portion of an image is the most visually arresting whereas the upper left corner is most likely to be overlooked.

Easy to Visualize

Despite these interesting factors revolving around eye placement, the rule of thirds is still essentially a simplified version of the golden ratio. Thirds are very easy to visualize and, therefore, easier for novice photographers to use with little forethought, whereas golden ratio photography is a little more technical.


Golden Ratio or Rule of Thirds?

What you choose to use for a composition will depend a lot on the scene you are trying to capture. The rule of thirds is great for minimalist photographs where you have a single subject, but if you wish to place several objects in a frame to emphasize movement, then the golden ratio photography technique would be your best option.

Golden Ratio or Rule of Thirds?
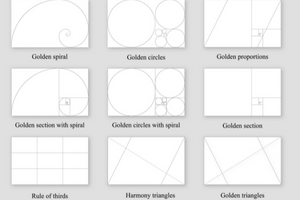
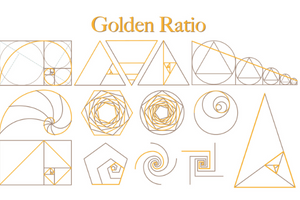
In fact, if you really wanted to spice up it up and double down on maths of an image, you could introduce Phi grid overlays into you object or landscape photography and make elements within the frame to fit the Fibonacci spiral.

Whether you decide to follow the golden ratio photography technique or not, always remember that your own photographs should always be just that, your own. If you don’t want to follow a certain rule, then feel free to break it.

Protecting your Golden Ratio Photography With Watermarks

You may not be aware that using online images without the owner’s permission is theft. Adding a watermark with your contact details or a logo will help to prevent this from happening to your golden ratio photography. Watermarquee offers an easy to use watermark which you create right in your browser with no downloads. Sign up today for unlimited watermarking.


Free Watermark Software – 12 Most Common Questions

Free Watermark software – Most Common Questions

If you have never used free watermark software you may have some questions – we are going to provide the most common questions about free watermark software.

1. What is the best free watermark software?

It is the one that:-

  • Does what you need it to do
  • Is easy to use
  • It should offer support and or a tutorial on how to use the software
  • Does the work on your browser
  • Doesn’t include the watermark company’s – ‘own’ watermark on your image
  • Allows more than one photo/image to be watermarked at one time
  • Enables saving and downloading of watermark – for easy retrieval


2. Is free watermark software really free?

Yes –  Water Marquee free watermarking software is a truly free version, it costs you nothing to use it.  There is no subscription service we won’t even ask for an email address.

It is all done right in your server.

Go on – give it a go!

The ‘cons’ are that you may only be able to watermark photos, 5 photos or images at a time, it may offer only a limited number of fonts and colors.

The paid ‘Pro’ version (for just $17.98 once only lifetime fee) offers an unlimited number of photos or images, more fonts, colors, and even more templates and other tools.

 3. Should I place a watermark on the original size of the photo?

  No.  When you watermark a photo or image at its original size when you shrink it the watermark becomes hard to read or see.

Wait till you have sized the image or photo to the final size you are going to use then place your watermark on it.

 4. Should I watermark my images and photos?

 Yes.  It depends on you – it is a personal choice; this is a long-debated topic.

On the one hand, the watermark can help protect your work; however, on the other hand, ensure the free watermark software doesn’t detract from the focus of the image or photo.

It’s your image – protect it!


 5. Where should I put my watermark?

 When placing your watermark try to put it in an area that does it is not easy to remove; for example, place a part of it on the object of the photo and part in the background.

If the object is a person put part of it on a leg or arm and the rest in the background area.

 6. What should I use as a watermark?

 Again this is your choice but you should think about it clearly and make sure it is something you can stick with.

Artists sign their work, even photographers can sign their name as a watermark.

Whatever you use you need to be sure it fits your work/company so later you won’t want to change it.

The more you change it the more confusing it is for your clients. You want people to see it an immediately know that this is your work.

 7. Do I have to download and install the free watermark software on my computer?

 This depends on what watermark software you are using.

There is the option of online watermark services like Water Marquee where there is no download and nothing to install.

WaterMarquee – free watermark software offers the ability to watermark up to 5 photos or images at once, have several fonts available and the ability to change colors.

There are also templates that can be used.

If you need more than that you can use a paid version that is only a one-time fee that is less than US$20.00.  The Pro version – is a one-time lifetime cost of only $19.  Check it out!

8. Can I watermark more than one photo or image at a time?

 Generally, yes but how many at once depends on the watermark software you are using.

Water Marquee does 5 at once for the free version and unlimited for the Pro version, called Batch processing.


9. Is watermarking software worth the price?

 That depends on how many photos or images you need your watermarking software to do.

If it is a matter of 50 or more a month then the price is worth it.

However, if your budget does not allow you to purchase it or you just wish to save money then try the Water Marquee free watermark software.

10. Is there something else along with watermarking my photo or images to help protect them?

 Yes, if your camera has a copyright feature make sure it is on. Also add important information date, name, time to the meta-description of your image.

11. Is watermark software copyright?

 A watermark helps identify your work but it is not a true copyright. It can, however, help prove the work is yours.

12. Can I save, download, or upload more than one image at a time?

 It depends on the watermark software or online service you are using. WaterMarquee free watermarking software allows you to download or export 5 images at a time or upload 5 images at a time.

If your question is not answered here, you should contact your watermarking software maker or community, check message boards to see if you can find the answer to your question.

You can find community boards and forums by searching Google for the name of your watermarking software (abc watermark) forums.

You can also check the site you bought it from for a forum or community.